.png?width=840&name=Holistic%20Dentistry%20Workflow-490x700%20(1).png)
This workflow is a combination of several philosophies, learned from different mentors and adapted and developed by my father to our reality. My personal learning experience (Christian) with Interdisciplinary, Smile Design and Digital Dentistry combined with Marcelo's knowledge, research and clinical experience on Occlusion and Interdisciplinary thinking process allowed us to incorporate some extra factors, fine tune the process and improve the efficiency and outcome.
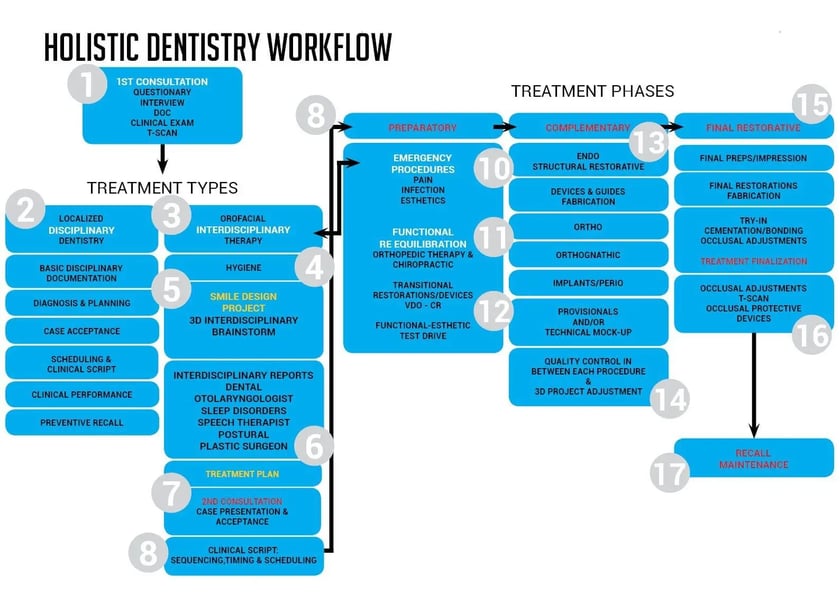
The workflow diagram highlights some important moments of the process. This is what we understand as the ideal combination between all Stomatognathic principles, Clinical Management and Technology implementation that allows us to deliver 21st century high quality care to our patients:
- 1st consultation interaction and DOCUMENTATION.
- Understanding what TYPE OF PATIENT and needs we are dealing with.
- If dealing with a Smile Design/interdisciplinary Case, evaluating the needs for EMERGENCIAL PROCEDURES.
- Understanding when to raise the Functional "Red Flag" and start the CranioSacral and Stomatognathic re-equilibration.
- For Orofacial Interdisciplinary cases, develop the SMILE DESIGN project before the Interdisciplinary Brainstorm.
- Develop the decision making process of a INTERDISCIPLINARY PLAN based on risk assessment and pros and cons, by comparing different options. Always focused on delivering the most straight forward and conservative solution to achieve the desired goal.
- Understand how to ethically educate and motivate our clients, creating perceived value and CASE ACCEPTANCE.
- Create EFFICIENCY through proper timing, SCHEDULING and clinical script based on the 3D Interdisciplinary Plan.
- Understanding the 3 PHASES of an Interdisciplinary Therapy: Preparatory, Complementary and Final Restorative.
- On the preparatory phase, dealing with emergencies and creating proper BIOLOGICAL CONDITIONS.
- Understanding how to achieve, stabilize and maintain proper FUNCTIONAL CONDITIONS.
- Understand how to use minimally invasive or prepless TRANSITIONAL RESTORATIONS to test drive esthetics and function before major irreversible clinical procedures.
- Prepare STRUCTURALLY the Stomatognathic system to receive the new project.
- Understand how to use technology to create the DEVICES AND GUIDES to control all clinical procedures and link the final outcome to the initial plan we presented to the client.
- Perform QUALITY CONTROL procedures, using 3D digital technology, in between every important clinical step, keeping the initial project in mind. If needed perform adjustments in the plan to deal with compromised situations.
- Utilize technology to create facially driven NATURAL LOOKING FINAL RESTORATIONS as similar as possible to the initial approved project.
- Precise occlusal final adjustments to increase longevity and PROTECT THE SYSTEM.
- RECALL AND MAINTENANCE scheduling according to the type of treatment and patient.
Holistic Dentistry Flow - Treatment Types and Phases
1. FIRST CONSULTATION. INFO INTAKE
The main goals of the first appointment:
- Simple and effective patient questionary. It should cover topics related to systemic, esthetic, structural/biological, functional and psychological issues.
- Rapport. Create an emotional connection with the patient since people will not treat their teeth with a doctor/team that they didn't sympathized. When we first meet somebody, it usually takes a few minutes to like or not that person. The first impression is very strong and usually harder to change, so giving importance to this first meeting IS very relevant.
- Efficient Clinical Exam.
- Correct and complete documentation. Pre-op models, bite MIC and/ or CR, basic photos and videos, X-rays, CBCT if necessary, periochart.
- OroFacial Esthetic analysis if it is a smile design case.
- Patient motivation and education increasing perceived value and the chance of the patient coming back.
2. DISCIPLINARY CASE
If the case is a simple case (Disciplinary Case) the specific problem should be immediately addressed and sometimes even taken care on the same appointment.
3. INTERDISCIPLINARY CASE
Or the case can be classified as a Smile Design/lnterdisciplinary case. This means a second appointment will be needed to present the plan after analyzing the documentation, developing the 3D design and having the interdisciplinary discussion.
4. HYGIENE SESSION
Immediately after the first appointment, a hygiene session will be scheduled if the patient agrees.
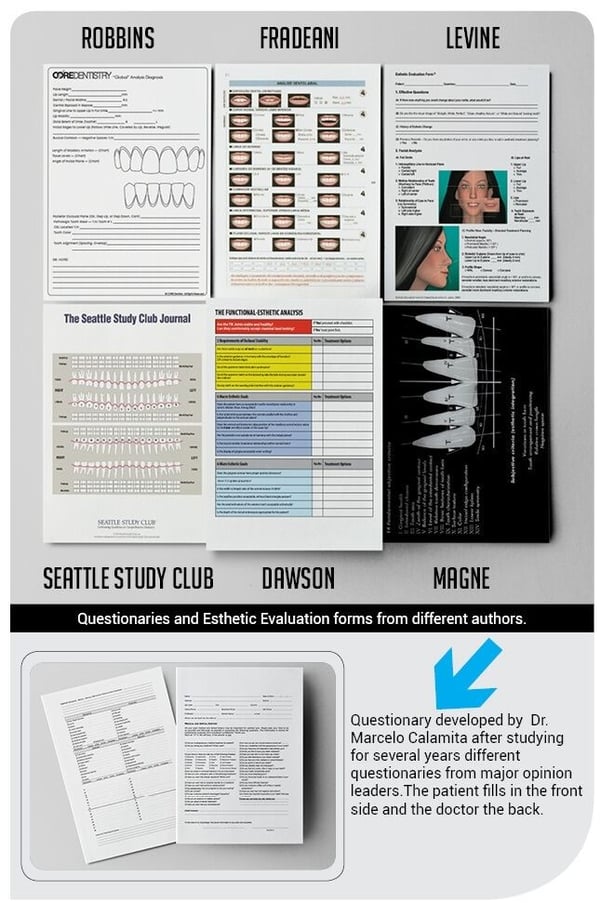
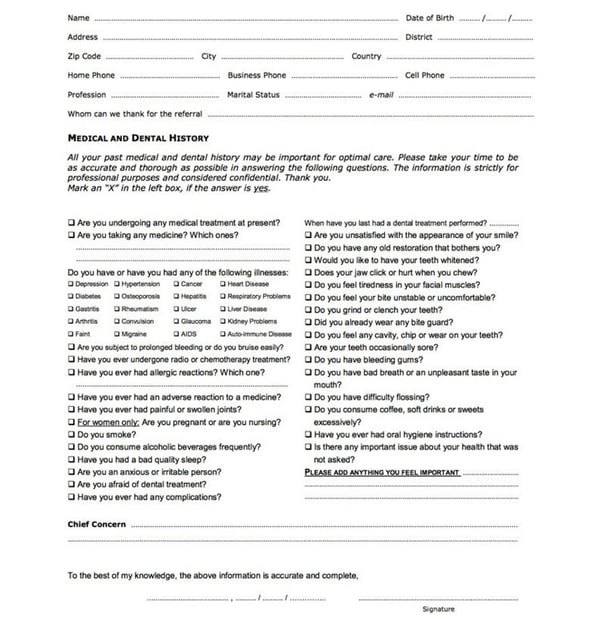
The main problem with questionaries and checklists is the excess of information, creating confusion and unnecessarily complicating the process. An ideal questionary needs to be simple, straight forward and summarize the information that will really impact on the diagnosis and decision making process.
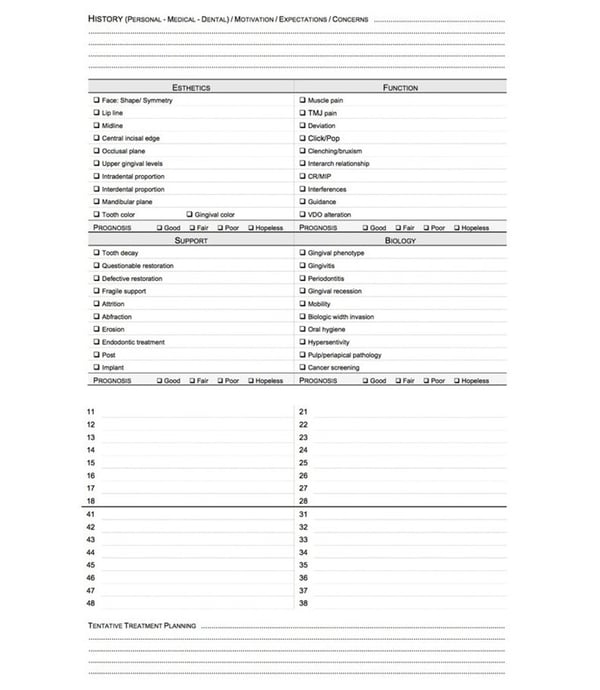
The 2 questionaries on the side were developed based on many years of evaluation of several different philosophies and authors. Bringing together the best of all of them and guiding the clinical through a simple and conclusive process. Also remembering that the information collected will be complemented with the 3D digital facial analysis, reducing the need of a deep facial analogue/clinical analysis.

If the patient demonstrates special postural issues or chronicle pain, extra information can be collected by this questionary developed by Dr. Robert Coachman in partnership with our Chiropractic and Functional Orthopedic specialists.
5. SMILE DESIGN PROJECT & INTERDISCIPLINARY BRAINSTORM
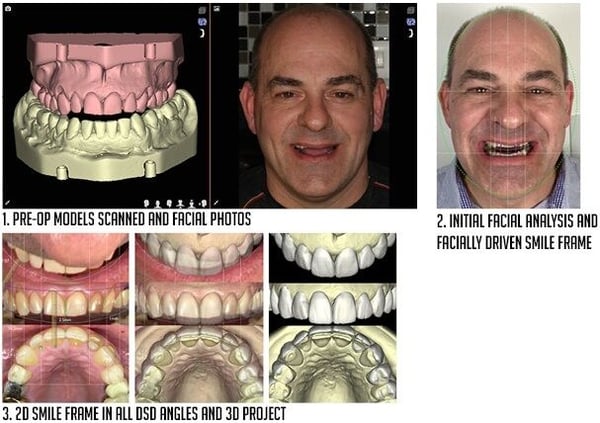
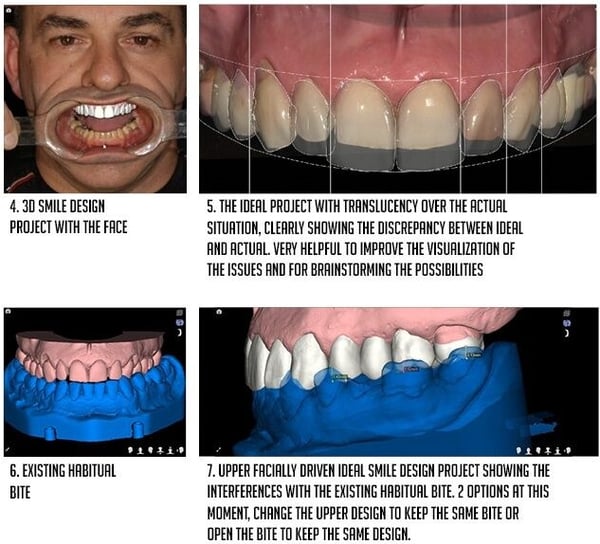
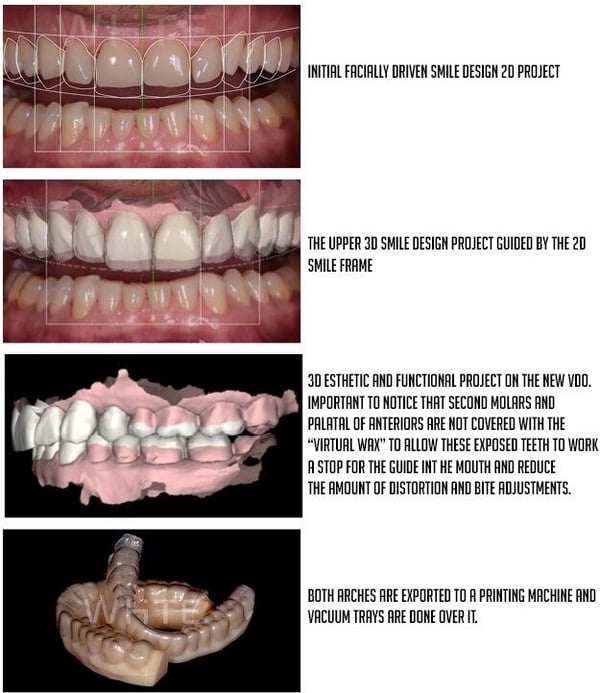
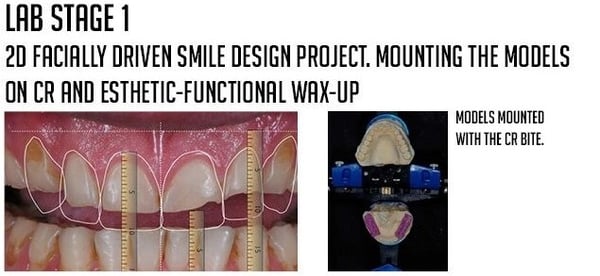
Also immediately after the first appointment, the smile design team will develop a 3D facially driven project that will suggest the best position of the upper arch with the face. At this initial phase, this project will be purely esthetically driven, not considering for a moment the functional issues and the lower arch (fig 1-4). This freedom will allow the designer to just take into consideration the esthetic parameters as if we were designing a denture for an edentulous patient and allow one to clearly see the discrepancy between the actual situation and ideal on the upper arch. The treatment planning starts at this moment, when putting translucency on the ideal project (fig 5) and analyzing the relationship with the underneath actual situation. Trying to find solutions for these discrepancies on the upper arch is the first goal.
Here we will evaluate: if the arch, teeth and gingiva are in a favorable position to make the ideal design possible. Sometimes the ideal design will create an unrealistic/unfeasible discrepancy and at this moment modifications on the design may be made to facilitate and simplify the treatment.
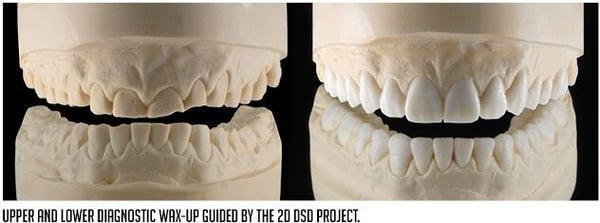
After this initial analysis and adjustments on the upper arch project, the lower arch will be brought into the game (fig 6) and will be compared with the ideal upper project (fig 7). Occlusal analysis of anterior and posterior relationships, possible interferences will be discussed at this moment. This information will be combined with the complete occlusal/functional analysis to define the strategy for the complete functional-esthetic integration.
6. INTERDISCIPLINARY SIMULATIONS & FINAL TREATMENT PLAN
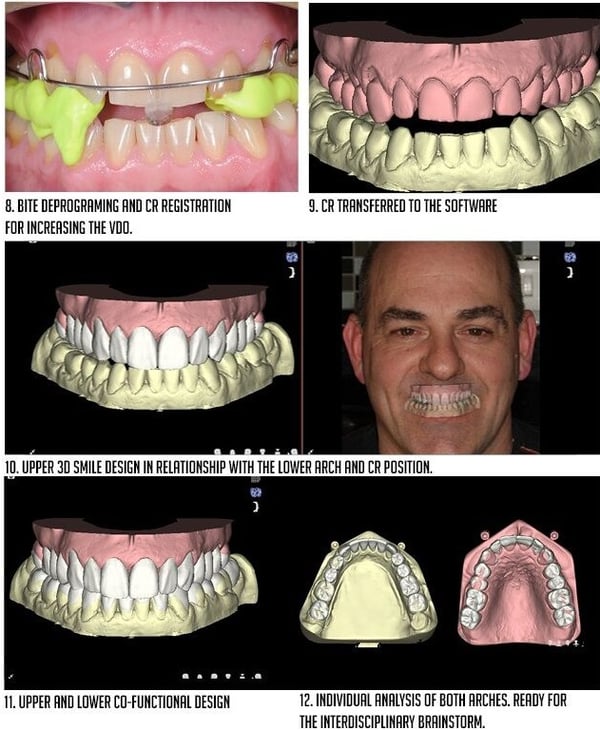
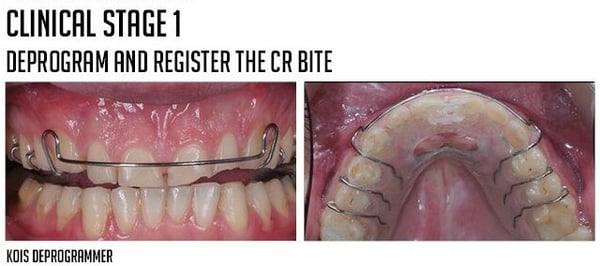
On this specific case, the advantages of of the opening of the bite were clear and the plan was to deprogram the bite with the Kois Deprogrammer (fig 8) and register the new CR position. This new position was digitalized and transferred to the new CR bite (fig 10) showing compatibility. This new VDO also created good clearance for a lower design with ideal intercuspation (fig 11). After upper and lower esthetic-functional design is done, now it's time to analyze both arches individually (fig 12) to check: arch, tooth and gingiva position; possible need for ortho or orthognathic procedures; overbite/overjet and guidances; restorative clearance, ferule and invasiveness of possible restorations; bio-mechanical issues, structure, number of abutments and pontics; and biological involvements.
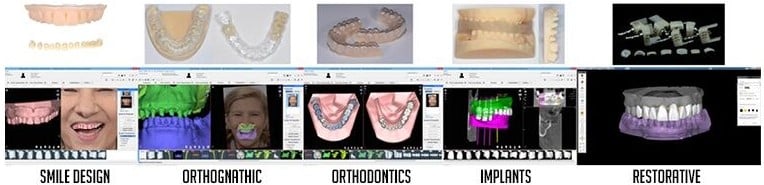
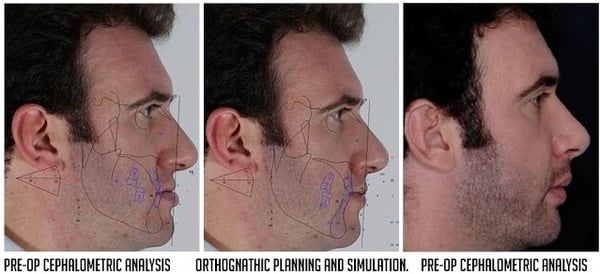
At this moment, the 3D functional esthetic project (fig 13) will be exported to all specialized parts of the software for the interdisciplinary test drive. Simulations will be made to check the pros and cons of different approaches. The beauty here is to be able to test drive virtually many possibilities before performing them clinically or even before presenting the plan to the patient. The ideal design will be analyzed with the functional movements in the virtual articulator (fig 14), will guide the orthodontic simulation (fig 1 5), will be integrated with possible orthognathic movements (fig 16), will guide the implant and grafting planning (fig 17) and will also guide the crown lengthening study and simulation (fig 18). This is what we call the Smile Design Guided Dental Brainstorm and will generate a pragmatic way of organizing pros and cons of all options, improving drastically the very challenging interdisciplinary decision making process.

The publication of Coachman, Calamita, and Sesma at JCD, Spring 2016, VOL 32, N1, that demonstrates the complete interdisciplinary digital workflow.
7. SECOND APPOINTMENT. CASE PRESENTATION & ACCEPTANCE
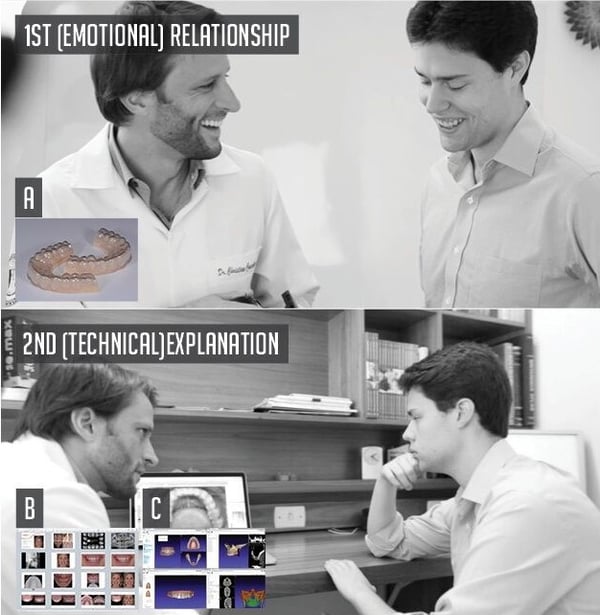
Emotional dentistry Approach. After the design and interdisciplinary plan are ready, the patient will come back for the second consultation or the treatment presentation appointment. The Smile Designer Center will send to the dentist what we call the "motivational kit". This kit consists of:
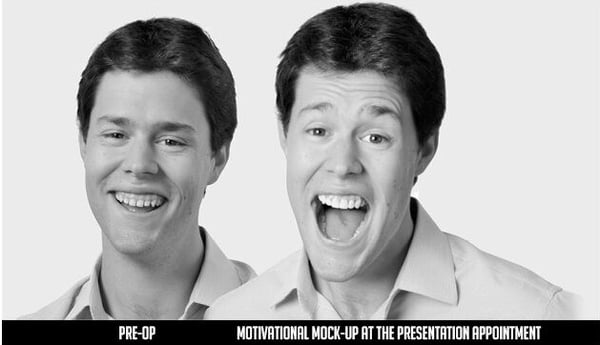
- The printed models of the 3D upper arch to perform the motivational mock-up (A)
- A Slide presentation of the highlights and insights of the treatment plan (B)
- The 3D projects to be used on the planning and on the presentation to the patient (C)
Always remembering that the key is to create a relationship of trust and rapport before talking about dentistry.
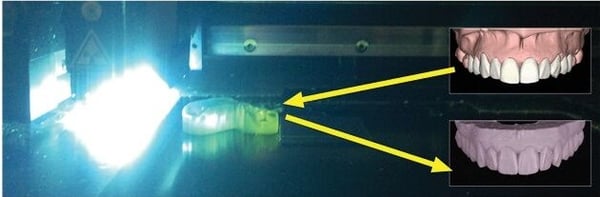
Utilizing 3D printing technology, the project will be transformed into a real model.

The goal is to surprise the patient with a motivational mock-up at the second appointment, before even talking about the treatment plan involved. This is one of the major parts of what we call "emotional dentistry" approach and will play an important role to create perceived value and case acceptance. Another important moment that shows the importance of smile design.
The motivational mock-up can be presented to the patient with videos and/or photos, always projected onto a screen instead of a mirror.
-min.webp?width=840&height=594&name=88-89%20(1)-min.webp)
Why doing a Mock-up?
Many reasons why is interesting to do mock-ups. There are in fact 2 types of mock-ups. The motivational mock-up that is done before case acceptance and it has to be additive. Its main goal is to generate an emotional link between the patient and the treatment, showing the esthetic potential of the case.
Since it has to be additive, it is not the ideal project always. It has to be adapted to the existing situation of the patient. Sometimes the motivational mock-ups are slightly bigger or longer than ideal but good enough to show to the patient and generate a positive response, if presented in the proper way.
The second type are the Technical mock-ups, performed during the treatment, that means, after case acceptance already happened. These mock-ups are usually done to test drive the esthetic, function and phonetics before going to final restorations and also to guide the tooth preparation, working as APT (Aesthetic Pre evaluative Temporaries) that will allow for the mock-up prep through technique, described by Galip Gurel.
1. DIRECT MOCK-UP
More share side time, no lab work. Design is done in the mouth.
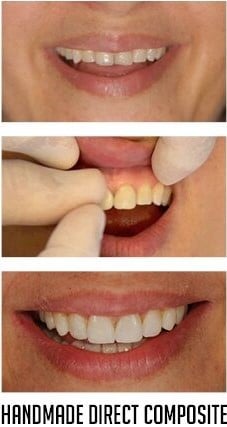
As is fabricated directly in the mouth, it can be done on the first appointment. No need for lab work.
Takes chair side time, therefore recommended when addition is not excessive. Requires very good hand skills and smile design know-how. Difficult to incorporate all facial esthetic parameters. Usually fabricated with direct composite.
Direct mock-up performed by Galip Gurel
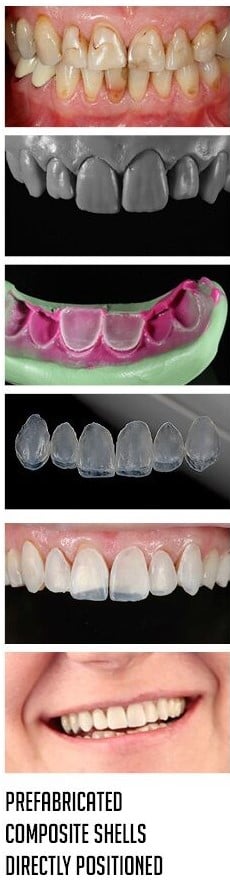
Also can be done on the first appointment and it doesn't require lab work. But it also takes chair side time and requires very good eye and hand skills. The main advantage in comparison to the handmade one is that natural morphology is achieved from pre made composite shells copied from natural models and its easier to move the shells and change the design.
2. INDIRECT/DIRECT MOCK-UP
Less chair side time, requires lab work. Design is outside the mouth, mock-up is done directly in the mouth.
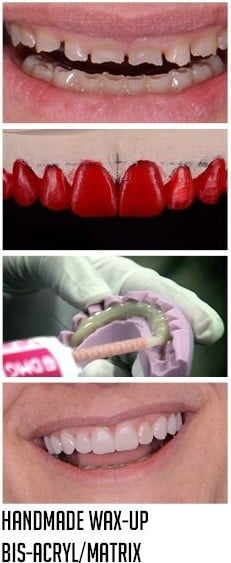
Also needs an intermediate digital step so usually done on a second appointment. Doesn't require a skilled technician and brings natural morphology from digital files.
Can be totally designed integrated with the face by using 2D and 3D images and videos. Usually themes facially driven besides the fact that the file can be saved and used on all the following steps of the treatment.
The project is printed and a silicone index or vacuum tray can be done. Usually made with bis-acryl resin.
3D project and mock-up performed by Francis Coachman
PRINTED MODEL BIS-ACRYL/MATRIX
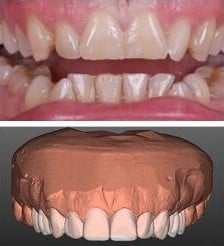
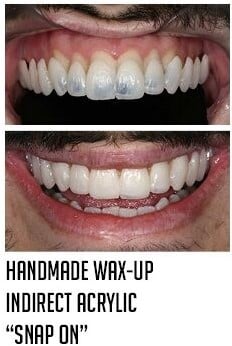
3. TOTALLY INDIRECT MOCK-UP
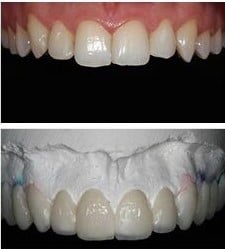
Wax-up and mock-up performed by Well Lab
3D project performed by Francis Coachman, Milling by Antonio Corradini
The same as the previous one but the design, instead of being achieved with a wax-up, it is done digitally. The project needs to be adapted in a CAD/CAM software to have the same characteristics as the previous one: enough thickness and strong connectors. This usually makes these devices more bulky, less delicate and less esthetic. It can also be used as an orthopedic/functional device, to re-equilibrate the bite, usually called as orthotic.
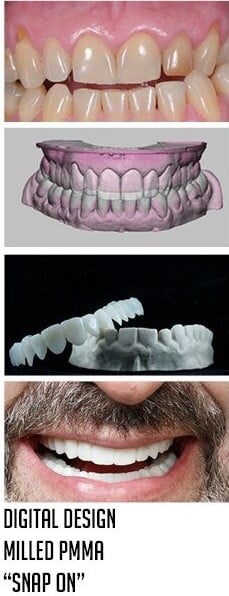
8. CLINICAL SCRIPT: SEQUENCING, TIMING & SCHEDULING
Organizing the agenda, scheduling and developing the treatment script with proper sequencing and timing is vital for the financial success of a dental clinic. Well planned cases can reduce significantly the number of appointments of a treatment improving patient satisfaction and profits. The case classification according to the smile design project will help us to organize the necessary procedures and the ideal sequence..
"If you know where you want to go, it's easy to get there" - Peter Dawson
"Well planned treatments will reduce considerably the number of the appointments, so investing on better planning is an important...
9. TREATMENT PHASES
After case acceptance the treatment process is divided in 3 parts:
- Preparatory
- Complementary
- Final Restorative
There are 2 basic issues that need to be addressed In the PREPARATORY PHASE: Possible emergencies and the need for re-equilibration of the Craniosacral system.
10. EMERGENCY PROCEDURES
In the preparatory phase there are 2 things that need to be controlled: possible emergencies and/or functional re-equilibration.
- Pain. We need to take care of pain before moving Into any interdisciplinary procedure.
- Eliminate or control acute infection process.
- Take care, in a palliative way, of major esthetic issues to give an immediate better social condition to the patient.
11. FUNCTIONAL RE-EQUILIBRATION
Suggested for patients with neuromuscular problems, postural problems, TMD, and chronic pain.
12. FINDING, STABILIZING, TESTING AND REGISTERING A REPRODUCIBLE AND HEALTHY INTER-MAXILLARY POSITION
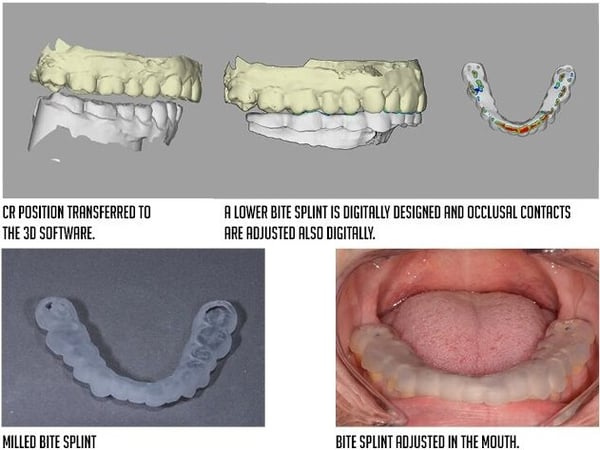
After the re-equilibration process is time to move from the craniosacral system to the stomatognathic system, from the body to the mouth. The goal now is to find the starting point position, usually called as Centric Relation. After registering this position that may include a new augmented VDO, its time to test it from the functional, muscular and comfort stand point. There are a couple of ways to test drive the new position:
BITE SPLINT is the first simple option to test drive this new position.
The 3 Step Technique
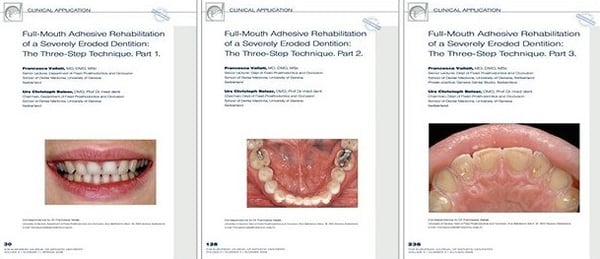
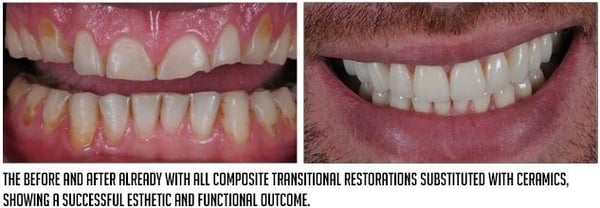
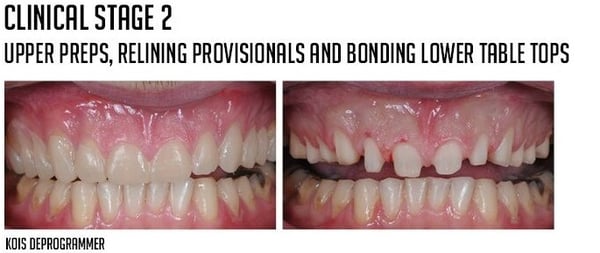
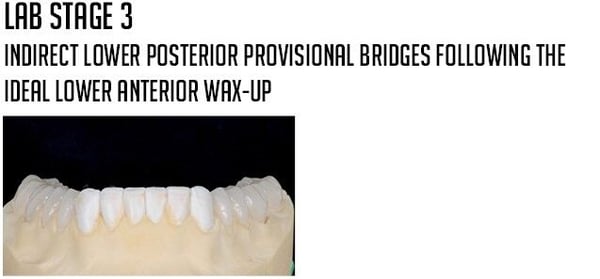
Transitional Restorations
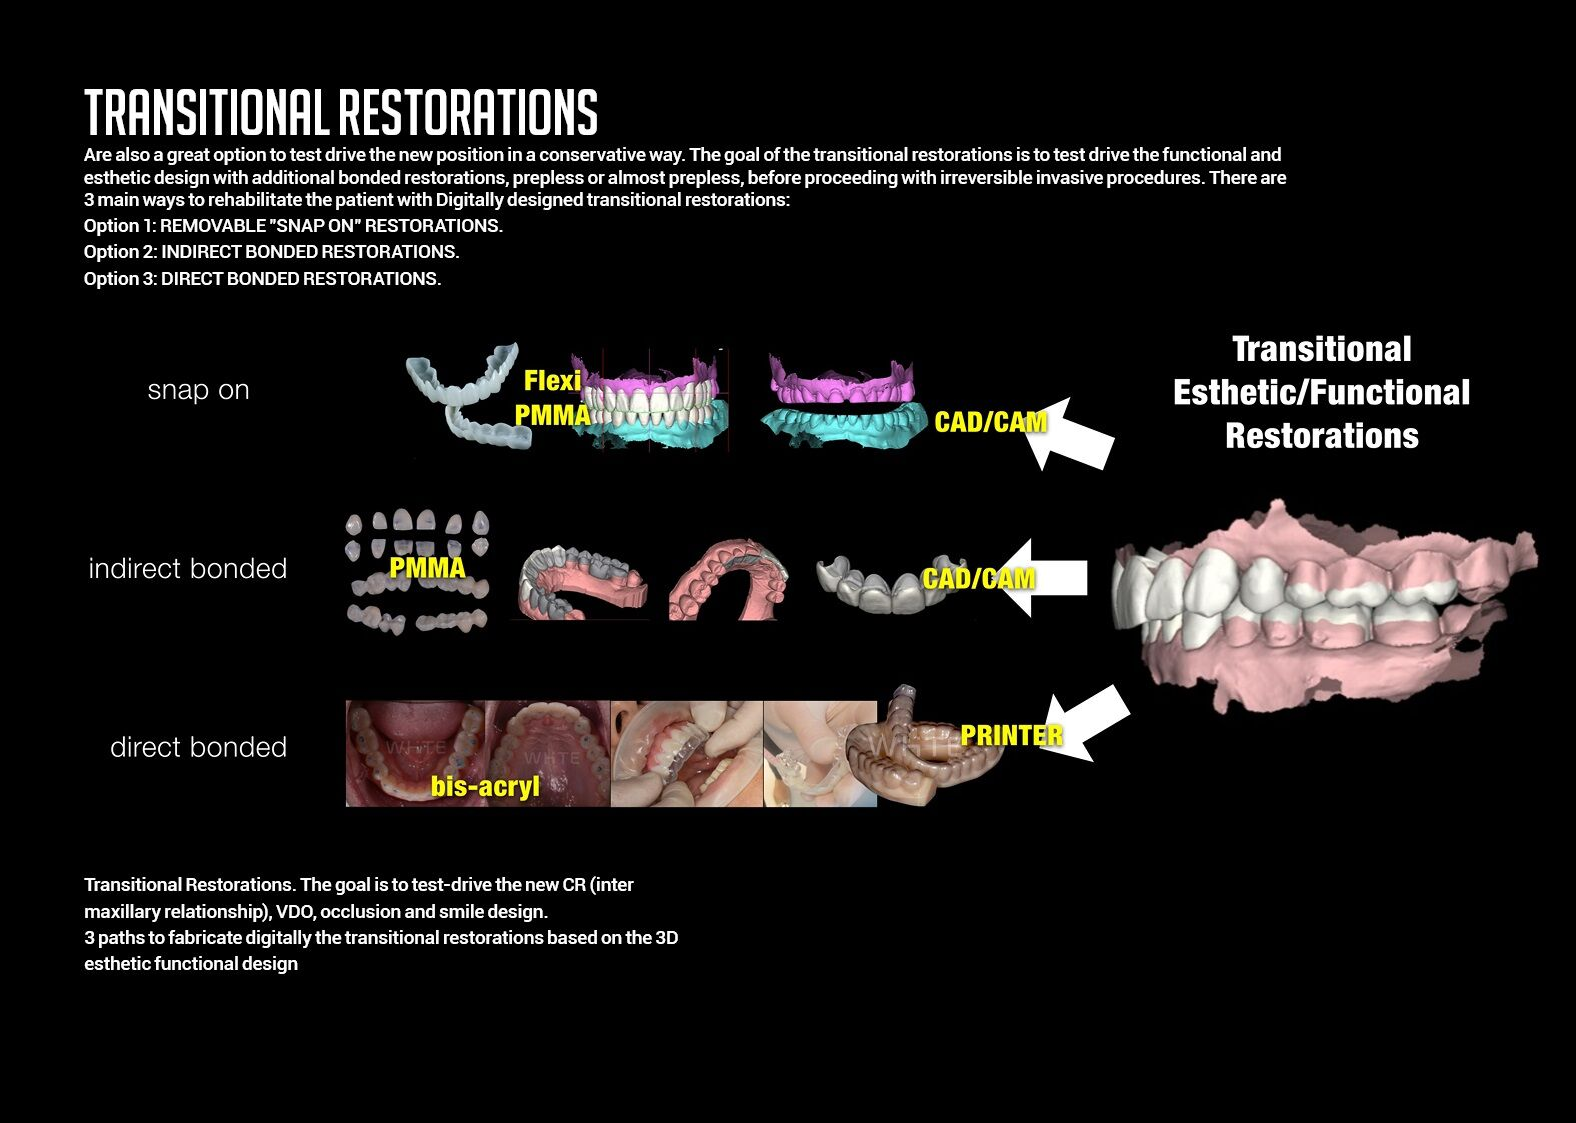
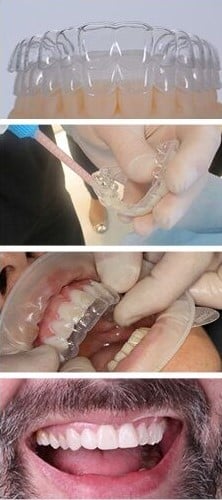
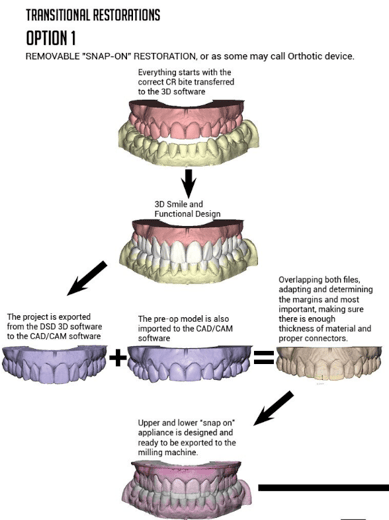
OPTION 1
TRANSITIONAL RESTORATIONS OPTION I REMOVABLE "SNAP-ON" RESTORATION, or as some may call orthotic device.
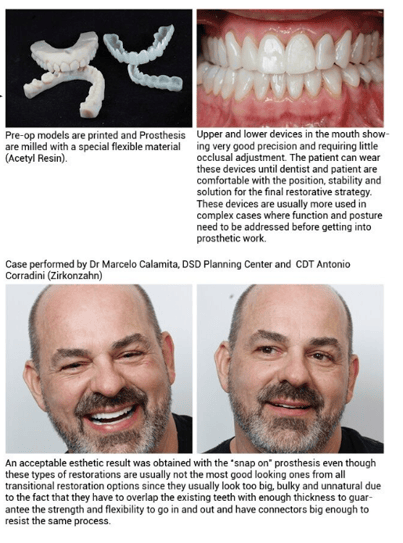
OPTION 2
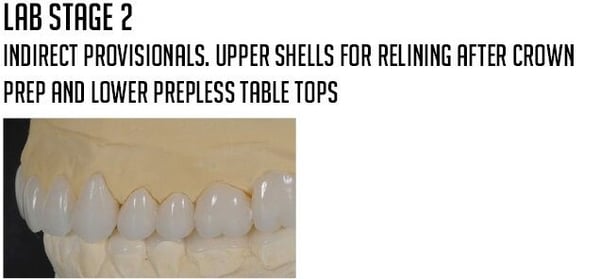
INDIRECT BONDED RESTORATIONS. Additional restorations that will be fabricated indirectly using milling technology. Usually fabricated in composite. This strategy is usually used when the transitional restorations will stay in the mouth for a longer period of time.
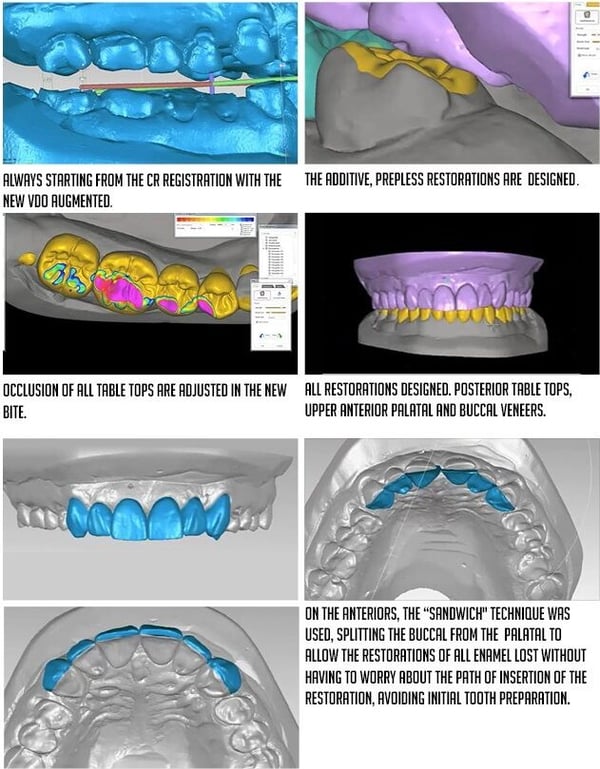
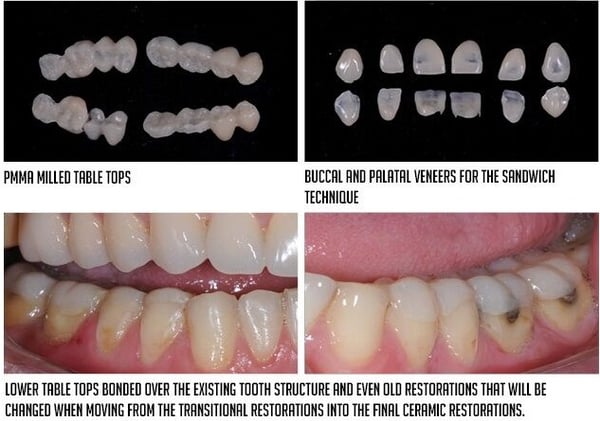

OPTION 3
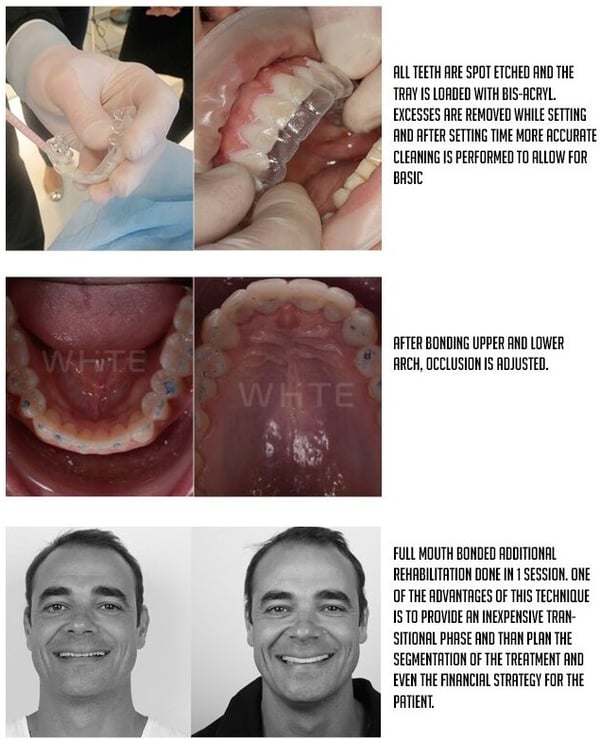
DIRECT BONDED RESTORATIONS. Additional restorations that will be fabricated directly using a guide done over a printed model of the project. This stage is usually the least expensive. Also advantageous to be used when clearance is not enough for the milled table tops. The disadvantage is that it deteriorates faster and is less friendly to the soft tissue and because of these reasons is usually used for a short test drive period.
13. COMPLEMENTARY PHASE
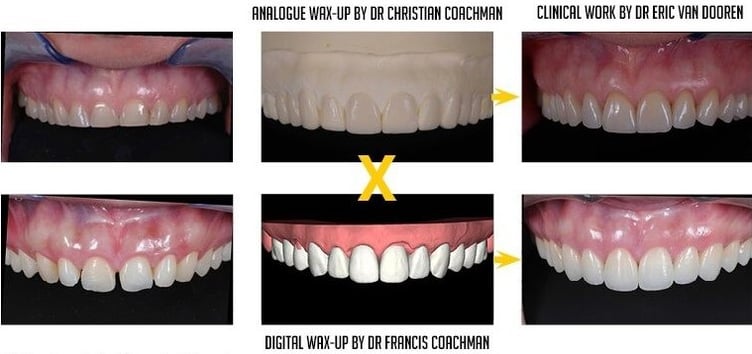
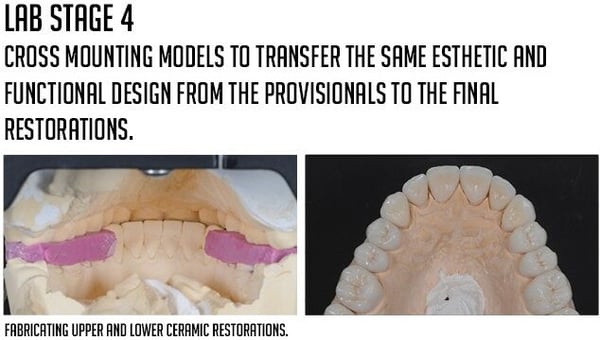
The clinical specialists developing each procedure with guides, digitally designed to respect the initial project. One of the major problems that we see in dentistry is the discrepancy between the final outcome and the initial project. Even on successful cases, if we compare the initial diagnostic wax- up with the final outcome we will see no relationship and usually esthetic and functional design, will be different. Modern dentistry should close this gap by using devices to guide each clinical procedure to achieve a final outcome more similar to what was presented to the patient at the beginning.
Clinical work by Marcelo Calamita
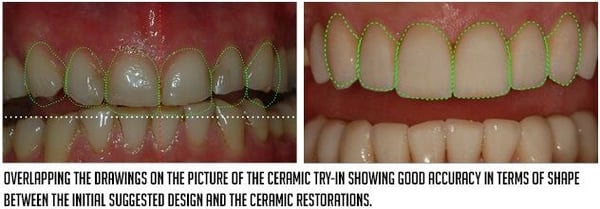
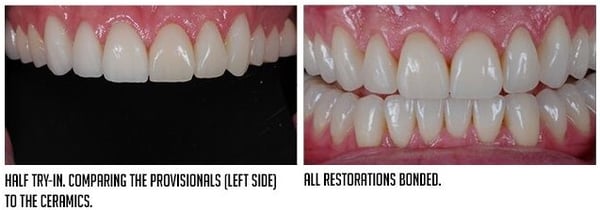
One of the main challenges of modern restorative dentistry is to achieve a final outcome similar to the initial design presented to the patient, usually on a wax-up. It's very difficult, with analogue procedures, to create this link. On this particular case is evident the difference between the initial wax-up and the final ceramics.
In our opinion this is one of the main benefits of the digital dentistry workflow, create an initial project and digitally design all guides, stents, aligners and restorations to deliver a case that has similar design and function of the initial 3D digital project. On this case one can see the exact same design on the initial digital "wax-up" and the final ceramics, even though the case went through ortho and perio procedures.
The key factor is for Digital technicians to understand how to import and overlap the initial design into each specific software to design all devices and produce them through milling and printing technology. These devices will guide the clinical procedures. At the end, the initial design will be overlapped to the scan of the preps and/or implants to develop provisionals and final restorations similar to the initial project approved by the patient and dentist.
Each part of the interdisciplinary software platform will generate the following files to be exported to milling and printing machines:
-
Smile Design software will generate models and guides for mock-ups and direct provisionals.
-
Ortho software will generate models, aligners and/or indirect bonding devices.
-
Orthognathic software will generate models and stents.
-
Implant/perio software will generate crown lengthening guides, implants guides, bone reduction guides, abutments, bars, frameworks and prosthesis.
-
Restorative CAD/CAM software will generate prep and reduction guides, provisionals and final restorations.
14. QUALITY CONTROL
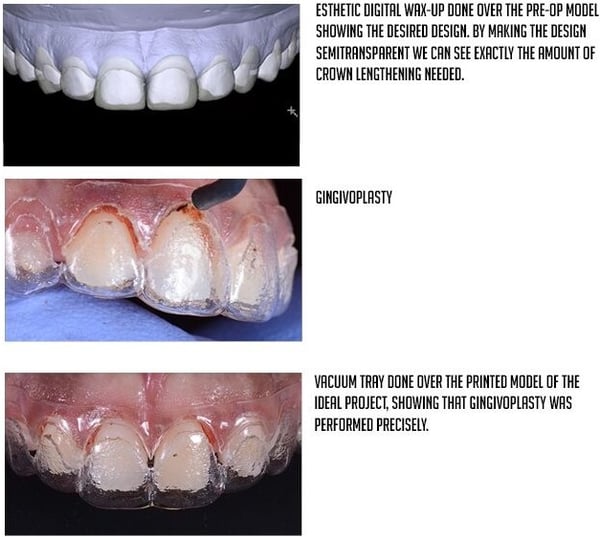
Quality control strategies should become a must in modern interdisciplinary dentistry and should be performed in between each important clinical procedure. If the treatment plan is facially driven and an initial beautiful smile design project is developed, the goal now is to make all specialists respect this plan and perform the procedures utilizing appropriate guides. Besides that, after the procedure is performed and tissues are properly healed, a quality control procedure should also be planned before moving to the next procedure. When doing this control, one will be able to realize if the project was respected or how far-off we are. At this moment fine-tuning procedures can be planned or a conscious decision of dealing with the compromise and adjusting the plan can also be made.
There are 3 ways of doing quality control: 2D, intraoral and 3D.
A. 2D QUALITY CONTROL
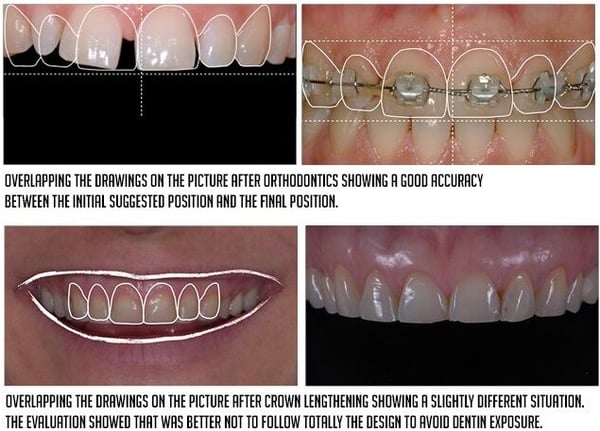
Is the most simple one. Drawing the objective over pre-op photos, making photos after the procedure and overlapping approximately the drawings over it to check the similarity between the outcome and the initial design. This is not completely accurate analysis but still very useful.
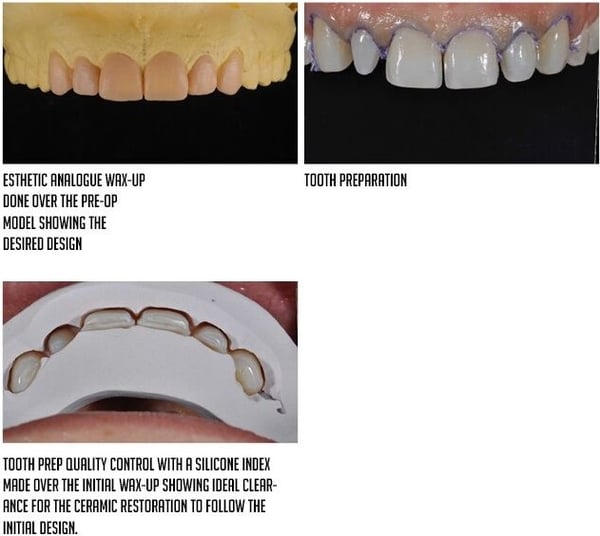
B. INTRAORAL QUALITY CONTROL
Performed by creating different types of guides (silicone indexes or vacuum trays), depending on the procedure, over the model of the ideal project (either an analogue wax-up model or a printed model of the 3D digital wax-up).
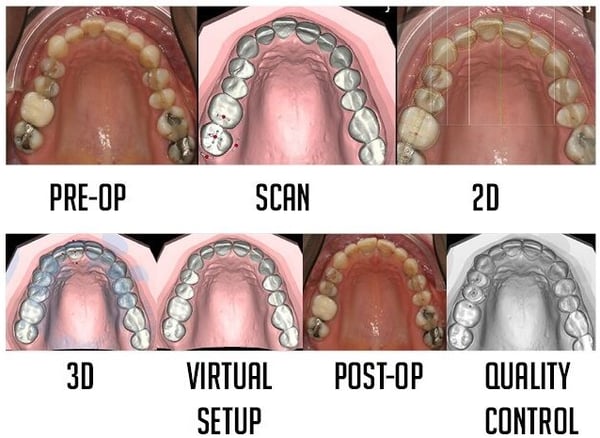
C. 3D QUALITY CONTROL
This will be the standard modern way of performing quality control in dentistry.
At the treatment planning phase the procedures will be digitally planned and simulated. The 3D file of the simulation will be saved. After performing the clinical procedure, the arch Will be scanned again. In the 3D software, both models will be overlapped (simulation + post procedure model). The discrepancies between both models can be easily evaluated allowing us to check how precise or far-off we are.
In implant dentistry we will overlap the digital implant placement to the scan of the real implant position. This will allow us to evaluate the accuracy of guided surgery procedures. The same can be done in orthognathic, crown lengthening and restorative procedures.
The example below shows this process on an orthodontic case. The movement is digitally planned. The file is saved. The orthodontic movement is performed and the overlapping is done on the 3D software showing the accuracy of the treatment.
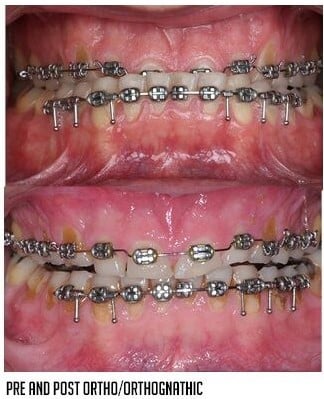
15. FINAL RESTORATIVE PHASE
Before entering the restorative phase, this case was prepared with orthodontics and orthognathic procedures.


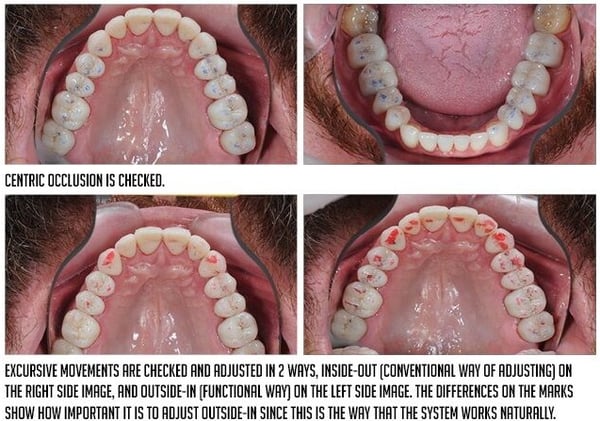
Initial occlusal adjustment is done at the day of cementation and is usually refined 1 week after.
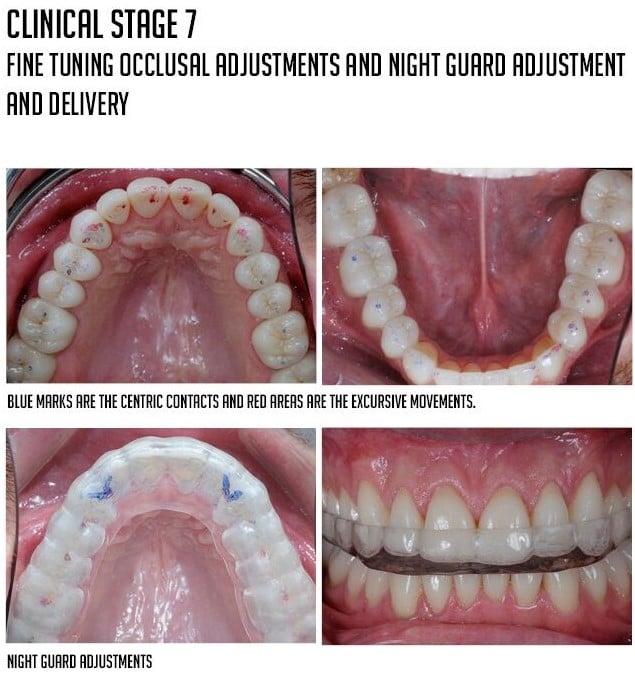
16. OCCLUSAL ADJUSTMENTS
One of the main reasons for restorative failures is the lack of proper and judicious occlusal adjustments after cementation. Understanding the correct protocols and materials for this adjustments is key. A good suggestion is to perform an initial adjustment at the day of cementation, and schedule an appointment one week later for the complete and delicate adjustment. Usually at the end of a long cementation session the dentist is tired and the focus IS not ideal to perform such an important step.
The utilization of T-Scan technology can also be useful at this time to evaluate the adjustment and identify possible spots that need to be further adjusted.
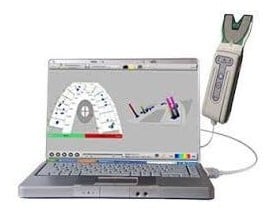
The T-Scan System. Useful for bite analysis, identify possible high spots that can cause restorative failures.
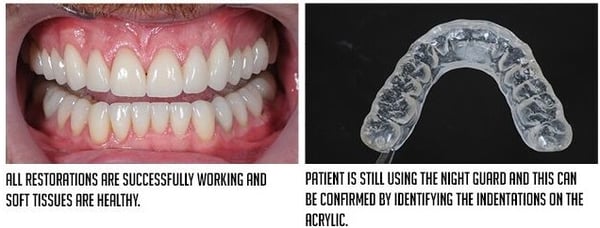
17. RECALL AND MAINTENANCE
 FACIALLY GUIDED INTERDISCIPLINARY THERAPY
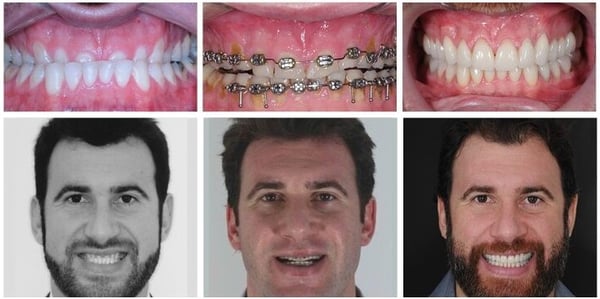
Prosthodontics and Treatment Coordinator : Marcelo Calamita
Orthognathic : Marcos Pitta
Orthodontics : Adalberto de Paula
Periodontics : Paulo de Carvalho
Smile Design : Christian Coachman
Ceramics : Edson da Silva
Do you want to learn how to become a modern dentist?